24 June 2011

"Rain-Coast": the Raincoat for Seattle

This project was inspired by a vintage Adidas rip-stop nylon in cobalt blue. The all-over abstract design is screen printed with a highly reflective ink.

This coat meets the needs of Seattlites and cyclists.
  • Eye-level drawcord on the hood ensures peripheral vision, and perimeter drawcord keeps hood snug around your face
  • Knee length coat protects from side-ways rain
  • Thinsulate insulation keeps you warm fall through spring, without adding bulk
  • Zippered "cash pocket" is easily accessible on left sleeve
  • Elastic and adjustable velcro cuffs help keep heat in and rain out
  • Two patch pockets with flaps
  • Interior zippered pocket, and inside storm guard lined with fleece
  • Drawcord at waist and hem.
  • Two-way zipper unzips from the hem so you can pedal easily
  • Reflective piping detail on front chest, back and sleeve
Inspiration Collage

Original Sketch

Reflective Piping at Chest, Contrast Lining

Clockwise from top left: Side-view with zipper pocket; Front-view with two flap/patch pockets; Back-view with reflective piping and hood drawcord toggle.

09 January 2011

Reflective Details

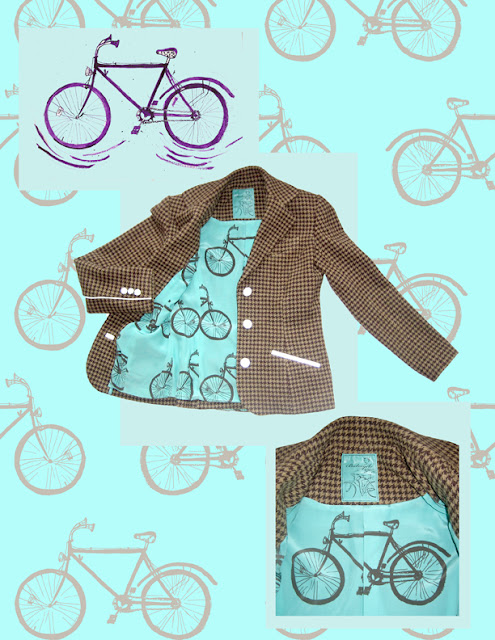
The fall quarter project was a tailored wool jacket from a basic block modified to our own design. In concordance with the theme of my final line, I decided to make this jacket with a cyclist in mind. The fabric is a vintage wool hounds tooth from my grandmother in Kansas.

Watercolor Sketch of Jacket with Shorts


Original pen and ink artwork placed into repeat and printed through Spoonflower.com. Lining is 100% silk.
Model wears Riding Jacket and Shorts. Flash photo shows illumination of reflective tape used on front welt pockets, bound button holes and covered buttons.

Left: Reflective tape in daylight with no flash appears as subtle black satin tape. Right: Back of jacket features secret zippered stash pocket hidden under three ruffles. Reflective piping at back sleeve seam and covered sleeve buttons. Shorts also have reflective welt pockets.

23 July 2010

Experiment with Acrylic Leather Paint

These white Saltwater sandals were picked up at "the Bins," the colloquial term for the Goodwill Outlet in Seattle's SODO, where they sell clothes, accessories, house-wears etc., by the pound. These almost broke the bank at $1.09.

Not enthused with the color, I ventured to MacPherson leather supply on 12th and bought some "Angelus Brand" acrylic leather paint, in "Neon Paradise Purple."

Left has two coats of paint, Right has one coat.
Even after the second coat I can still see the brush strokes, but the color is super saturated and beautiful. We will see how they fare in the humidity and heat when I go on vacation to DC and NYC.

Update: The paint works and the color evokes compliments. 

22 July 2010

Bobby Belt


I had the idea for this when I was visiting NYC in September. Then school happened and I haven't had time to make it until now, ten months later.

Procedure: I spray painted a whole pack of bobby pins gold, and then went to Sally Beauty supply to buy more and saw that they sold gold ones. Less time inhaling toxins is fine with me.

I bought some pretty black elastic at Stitches and found the interlocking belt buckle on a belt at Value Village, which I also spray painted but it's already flaking.

It is a less threatening take on the bullet belt. The wearer is armed to help a burlesque performer keep her wig on.

16 July 2010

Stud-Dress

This one is a knock-off of a Kenneth Cole New York dress. 

It has princess lines, a shoulder yoke, front placket, kimono sleeves (so fun and easy to pattern!) thigh pockets, rolled cuff with button tab and stud detailing through-out.

 The hardest part about the pattern making was getting the proportions right. The biggest challenge for the sewing was that I used a poly satin that I found about 3 yards of at Value Village, and while it was a bargain, it was not worth the difficulty of working with. 

It was very slippery and I had so many seams with top-stitching, I had to work hard to avoid puckering.

Applying the studs was fun but time consuming. I had to use my awl to puncture the fabric  and then use pliers to secure the stud backs (like paper brads). 


I can't wait to wear it with my bobby-pin belt....more to come on that soon!

Restyling 101

Before:
  • Large Puffy Sleeves
  • Calf-Length
  • Straight Silhouette

After:
  • Sleeveless
  • Cape/Hood
  • Mid-Thigh
  • Slightly Fitted

Shibori-Inspired Hand Dyed Hoodie

This project was to familiarize us with knits and elastic, and to make a fun little hoodie in a day. I hand dyed my fabric, drawing inspiration from Japanese techniques.

I cut out the fabric and then rolled up each piece, securing it with rubber bands. I then placed all the bundles in a giant pot and dyed the fabric using iDye violet. The result is that I was able to control the direction of the white striping.

Dupioni Design Skirt

A beautiful silk fabric with an iridescent effect.

This project was our first time working on and figuring out a pattern completely on our own. Everyone worked independently on the same design. 

We used a straight skirt sloper and manipulated it to create tucks and pleats across the front. 

Woolly A-Line

This was the first big sewing project of fall quarter of the first year of Apparel Design at SCCC. It features two different styles of front pockets, an inverted box pleat at center front and a full lining (its bright purple!)